Showing posts with label Web Service. Show all posts

Monday, September 22, 2014

Jboss EAP 6 : Remote Access to Admin Console and To Web Services in JBoss AS 7 / JBoss EAP 6

By default, JBoss can be accessed only locally using the address 127.0.0.1. So I wasn't able to access the console neither to the web Services (once the application deployed, coming below).
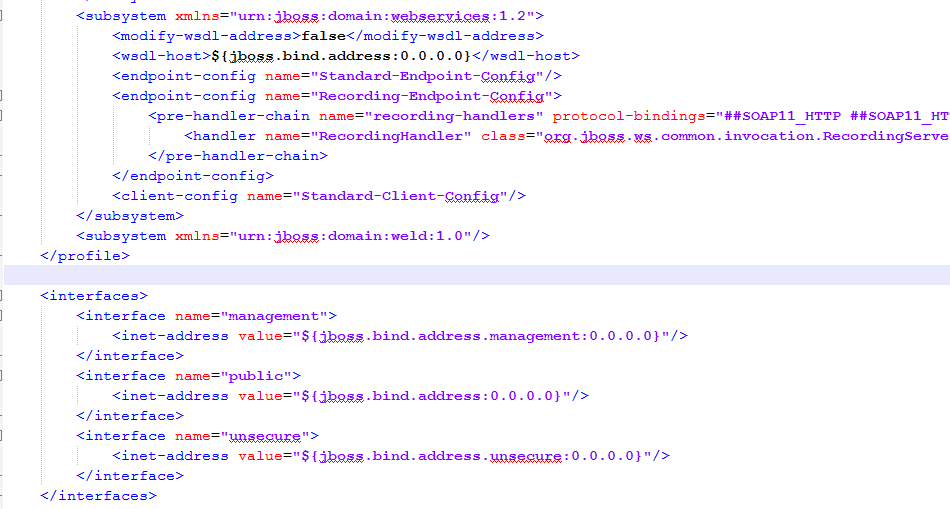
To fix that, we need to make some changes in the "jboss-eap-6.2/standalone/configuration/standalone.xml" where I change the IP addresses from 127.0.0.1 to 0.0.0.0. Like this, JBoss will accept remote call to the Console and to the Web Services.

If your Server is locally, there is no need for this Step and go directly to /jboss-eap-6.2/standalone/configuration/Standalone.xml.

ELSE  :
In order to make it easy to edit remote files, configure FileZilla to edit your files using your favorite program. So in FileZilla go to Edit->Settings and choose you program.


Then:
Come back to Standalone.xml, it should look like this:

So all the addresses are 0.0.0.0.

Now you will be able to access remotely to your Console and to your WSDLs.


Wednesday, September 17, 2014

Test Automation Tutorial : Test your Software using SoapUi and Create a Test Case

Hello everybody. Today I will show you some tips on using SoapUI to test your software.

I have developed an application based on Web Services, so in order to test that, I use SoapUI which is a nice tool to test the web services by giving the WSDL location or address.

So Lets start.

Step 1 : Open Project

You need to create your project either by giving the WSDL address or the path to your WSDL located locally in your laptop.


Step2 : Create you testSuite.


You can create a test case by cright clic on the project and create test case. 

Or you can clic directly on the desired request and add to TestCase.

Then you create a new one or you add it to an existing one.


 The Request is then added to the TestCase. You can add multiple ones and fill the parameters then run the test. In order to make sure that you are the desired behavior see step3.


Step 3: Add Assertions to your Test Suite


For the first time, running my test Suite, I was happy that everything is all right. Yeeeh I thought that my code is super but I have seen after that it is every time green even if I am waiting an exception. In fact, SoapUI consider that your test is OK when you receive a response independently on the request type.
Hopefully, there is a solution to fix that. It is by adding ASSERTIONS to your requests. Many assertions types are available, but here I use
-  Fault SOAP : I know that my response is NOT OK and I would like that my Test Suite don't stops at that levl.
- NOT Fault Soap: Here, I suppose that the response shouldn't be an error or exception, If so  my test fails and stops at that step.
- Contains: The returned result should contain some characters.

So here how to add ASSERTIONS:

Clic on the Request. The little botton on top (or The is also "Assertion down the request page") is the one to use in order to add assertions.


Many assertions are available and you can choose what fits to your case. For me I need mostly the NOT SOAP Fault, But SLA is also very good to choose a timeout for your resquest.


You can see down the added assertions :


So once you have added a NOT SOAP FAULT ASSERTION to your test case, if you receive an error and hence a soap:fault, your test you fail (RED) and you will know that something is wrong.


Step 4: Add Delay between too Steps


Executing the test Case, sometime we need to have some delay before executing the next step to make sure that the changes are commited in Data Base. So I was searching for how to add Delay before a request in the test Case.
This is possible by adding a special Step which is Delay.

So right clic on the Test Case -> Add Step -> Delay


Once the Delay Step created, change the desired millisecond and put the Delay Step before the request that you need to delay.


Step 5 : Export Test Case and use it in another project.


Deploying my application on a remote server, my logs was not yet working (need to fix it  ;) ). So  I needed to execute the same testSuite on my Local Server. I was able to re-create the same test case, but SoapUI gives us the possibility to export only a testCase and use it in another project.


So clic on the Second project and import that Test Suite:


Hope that you enjoyed the small tutorial :).

Tuesday, March 18, 2014

Resolve java.util.List is an interface, and JAXB can't handle interfaces.

Working on a Web service, I caught this error while deploying:

Caused by: com.sun.xml.bind.v2.runtime.IllegalAnnotationsException: 1 counts of IllegalAnnotationExceptions
java.util.List is an interface, and JAXB can't handle interfaces.
this problem is related to the following location:
at java.util.List

The problem comes from my WebMethod where I am returning a List<List<Car>>.  JAXB don't know how to handle this. So I have found a Solution where I define a new bean conating the List:


Class Cars{
    private List<car> cars;
...

}

So my WebMethod will return List<Cars>. This new bean resolves the problem. Make Sure also that the attribute is private (or don't put it at all, by default it will be private) otherwise you can have an error :
Class has two properties of the same name. See this post.


Ref : https://stackoverflow.com/questions/298733/java-util-list-is-an-interface-and-jaxb-cant-handle-interfaces

Tuesday, January 21, 2014

Expose Both Soap and Rest in the same application using CXF

I was searching for exposing a web service using both Soap and Rest.
Doing some research in the internet, I have found that this is possible using CXF, please refer to this CXF Article.


https://cxf.apache.org/docs/jax-rs-and-jax-ws.html

http://soa2world.blogspot.com/2008/05/implementation-of-rest-and-ws-soap.html


Sunday, November 24, 2013

CreateProcess error=87, The parameter is incorrect Using JBoss eap WSConsume and Ant

Trying to run an ant file, when I got this error:

D:\workspace\test\wsclient-ant.xml:33: java.io.IOException: Cannot run program "C:\Java\jdk1.6.0_20\jre\bin\java.exe": CreateProcess error=87, The parameter is incorrect


This error is generated due to this part of my ant file:

<wsconsume 
fork="true"
keep="true"
verbose="true"
destdir="${binDir}"
sourcedestdir="${sourceDir}"
wsdl="${wsdlUrl}"
binding="${basedir}/jaxbCalendarBinding.xml"/>


and the command invoked was :

Command invoked: org.jboss.ws.tools.cmd.WSConsume -k -b D:\workspace\test\jaxbCalendarBinding.xml -o D:\workspace\test\build\bin\classes -s D:\workspace\test\build\src -v http://localhost:8080/MyService/MyService?wsdl

As the command was too long, and I have specified using fork=true that I would like to generate this task in a separate VM, eclipse was enable to do it.

The solution was to put the fork=false.

Thursday, November 21, 2013

Monitoring SOAP Messages : Logging SOAP Request / Response

When developing a web service, we need sometime to see the traffic sent and received between the Server and the client. So we need to watch the SOAP Requests and Responses exchanged.

To do this using metro, we can add just one code line :

Server Side :
com.sun.xml.ws.transport.http.HttpAdapter.dump=true;

Client Side:
com.sun.xml.ws.transport.http.client.HttpTransportPipe.dump=true;  

As I am using JBoss, so I have added these parameters in the VM :

  •  Dump the SOAP messages on the client side: 

-Dcom.sun.xml.internal.ws.transport.http.client.HttpTransportPipe.dump=true 

  • Dump the SOAP messages on the Server side:

-Dcom.sun.xml.ws.transport.http.HttpAdapter.dump=true 


Sunday, November 10, 2013

Web service Jbossws cxf: Enhance the Performance to get the service and the port getSertvice and getPort resolved

I was testing a Web Service developed respecting the JAX-WS specification and deployed on Jboss 6. The stack used by the Jboss is the JBossws-cxf 3.4.

Every time I call the getPort, it takes a good laps of time :

myService = new mydevelopedWSService();
System.out.println("take a port takes time " +System.currentTimeMillis());
mydevelopedWS myPort = myService.getmydevelopedWSPort();

In fact what I have find in the internet and in different forum, is that initializing the service involves reading and parsing the wsdl, and getting the port involves the creation of a dynamic port. Oracle specifies that by getting a dynamic client proxy, the application retrieves and interprets the WSDL and dynamically constructs calls. A dynamic proxy client enables a Web service client to invoke a web servicto invoke a Web service based on a service endpoint interface (SEI) dynamically at run-time (without using clientgen, wsconsume in jboss or wsimport in metro). This option does not rely upon a specific service implementation, providing greater flexibility, but also a greater performance hit.

In JBoss, I was trying to reduce this call time, and have seen that by chanding a properti in a file in the deployers, it can reduce considerably the time.

Here is the change to do. Open the file "stack-agnostic-jboss-beans.xml" located in "C:\jboss-6.1.0.Final\server\myconf\deployers\jbossws.deployer\META-INF". This property

<property name="webServiceHost">${jboss.bind.address}</property>
<property name="modifySOAPAddress">false</property>

 The default value is set to true, which means that JBoss is re-writing the soap-address in the WSDL every time we are retrieving it even if the specified address is valid. I have changed this property to false in order to disable this re-write and the application performance was better.

In JBoss eap 6.1, this parameter can be changed in the Standalone.xml located in JBoss-eap-6.1HOME\standalone\configuration.


Sunday, November 3, 2013

Invalid endpoint address in port portName in service ServiceLocator: REPLACE_WITH_ACTUAL_URL


When developing a web service, we often generate WSDL automatically using Wsimport in metro or Wsprovide in Jboss.
When I was trying creating a Wb Service client, I have had this error:
Invalid endpoint address in port portName in service ServiceLocator: REPLACE_WITH_ACTUAL_URL

In fact, in the generated WSDL, there was

<soap:address location="REPLACE_WITH_ACTUAL_URL"></soap:address>

where the Address should be replaced by the service Address

<soap:address location="http://localhost:8080/service/myService.ws"></soap:address>

Tuesday, October 29, 2013

Change Soap Request Response Header : java.lang.UnsupportedOperationException / javax.xml.ws.soap.SOAPFaultException: Fault string, and possibly fault code, not set


While testing a web service, I have encountred this error:

javax.xml.ws.soap.SOAPFaultException: Fault string, and possibly fault code, not set
at org.apache.cxf.jaxws.JaxWsClientProxy.invoke(JaxWsClientProxy.java:146)
...
Caused by: java.lang.UnsupportedOperationException
at java.util.AbstractMap.put(AbstractMap.java:186)
at org.apache.cxf.binding.soap.interceptor.SoapPreProtocolOutInterceptor.setSoapAction(SoapPreProtocolOutInterceptor.java:120)
at org.apache.cxf.binding.soap.interceptor.SoapPreProtocolOutInterceptor.handleMessage(SoapPreProtocolOutInterceptor.java:62)
at org.apache.cxf.binding.soap.interceptor.SoapPreProtocolOutInterceptor.handleMessage(SoapPreProtocolOutInterceptor.java:46)
at org.apache.cxf.phase.PhaseInterceptorChain.doIntercept(PhaseInterceptorChain.java:255)
at org.apache.cxf.endpoint.ClientImpl.invoke(ClientImpl.java:516)
at org.apache.cxf.endpoint.ClientImpl.invoke(ClientImpl.java:313)
at org.apache.cxf.endpoint.ClientImpl.invoke(ClientImpl.java:265)
at org.apache.cxf.frontend.ClientProxy.invokeSync(ClientProxy.java:73)
at org.apache.cxf.jaxws.JaxWsClientProxy.invoke(JaxWsClientProxy.java:124)


In fact, I have a client web service code trying to add a SOAP header to a request before calling the Web service.
The problem comes from this part:

BindingProvider bp = (BindingProvider) webServicePort;
bp.getRequestContext().put(MessageContext.HTTP_REQUEST_HEADERS,
Collections.singletonMap("Cookie", Collections
.singletonList(yourCookieString));

In fact Collections.singletonMap() is used to get an immutable map which cause a UnsupportedOperationException in the getRequestContext().put() method.
Thanks to Ridwan Nizam, we have changed the code :

BindingProvider bp= (BindingProvider) webServicePort;
Map<String, List<String>> singletonMap = new HashMap<String, List<String>>() singletonMap.put("Cookie", Collections.singletonList(yourCookieString));
bp.getRequestContext().put(MessageContext.HTTP_REQUEST_HEADERS,
singletonMap);

Great, the Exception is then RESOLVED ;)


Biblio:
http://blog.sanaulla.info/2012/11/28/unsupportedoperation-exception-while-using-map-in-java/

Monday, October 28, 2013

Cannot be cast to com.sun.xml.ws.developer.WSBindingProvider: Jboss5 with Metro to Jboss6 /JBoss EAP 6 with JbossWS-Stack

I was working on a migration form Jboss5 using Metro to a Jboss6.1 using the JbossWS-CXF3.4 stack which comes with Jboss.
When I run my application, I have this error :
Cannot be cast to com.sun.xml.ws.developer.WSBindingProvider

In fact, I have a code, where the Webservice Port was cast to com.sun.xml.internal.ws.developer.WSBindingProvider

 WSBindingProvider bp = (WSBindingProvider) webServicePort;

This cast works before with Metro as we use the Sun reference implementation of JAX-WS. As Jboss6.1 comes with CXF stack for web Service, this cast should be adjusted by using javax.xml.ws.BindingProvider.
So the code becomes :

BindingProvider bp = (BindingProvider) webServicePort;

Hope it helps you :)

Tuesday, February 12, 2013

Web Service using Apache-CXF 2.7.3 and Spring 3.2.1: Bottom-Up


In order to create a web service from an existing project, I have chosen to work with Apache CXF framework, which allows to generate buttom-up WS but also contract first WS. In my case, I have already my developed code, and should create the WS based on that code.

About Apache CXF:
  • CXF supports several standards including SOAP, the WSI Basic Profile, WSDL, WS-Addressing, WS-Policy, WS-ReliableMessaging, WS-Security, WS-SecurityPolicy, and WS-SecureConversation.
  • Apache CXF offers both contract-last (bottom-up) and Contract-first (starting with the WSDL) approaches.
  • Apache CXF implements JAX-WS and JAX-RS.

Environment installation in Eclipse:


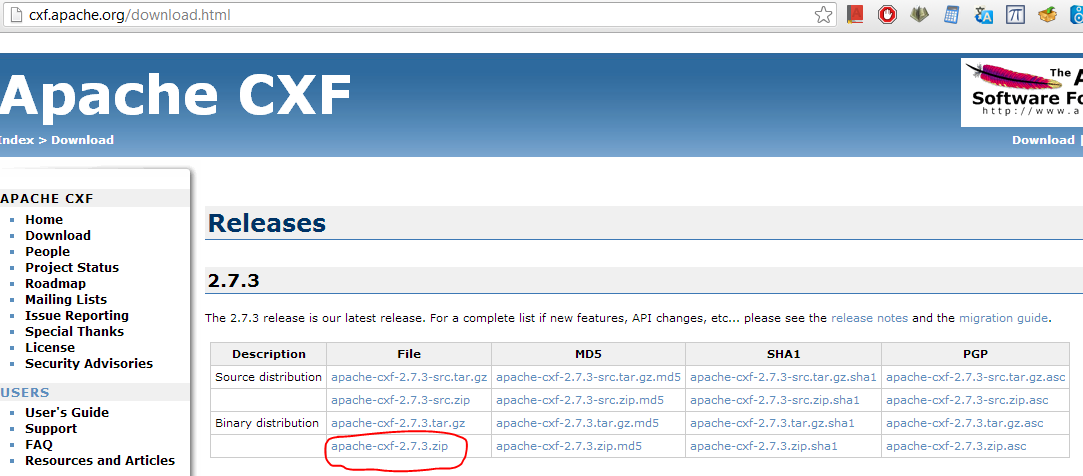
  •  Download Apache CXF binary distribution 2.7.3 version:

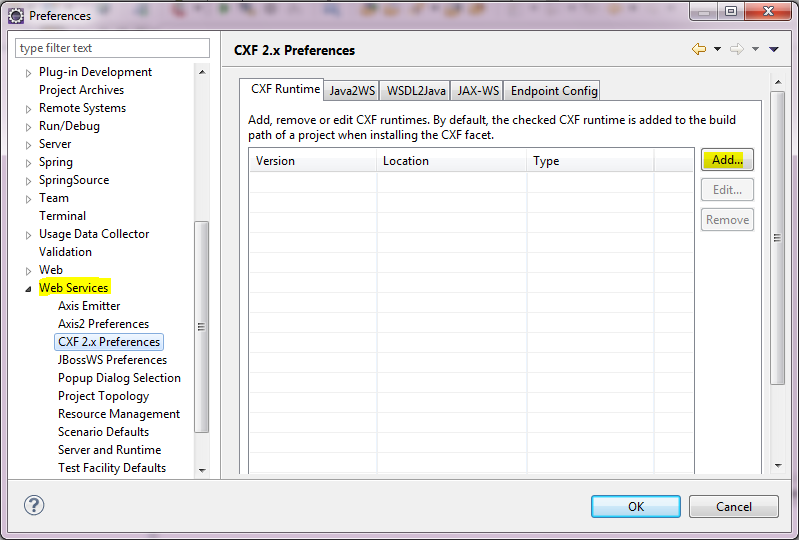
Open the preferences window in eclipse, Window-> Preferences, to setup the apache server


  • Setup of Apache CXF preferences


We should give here the path to our downloaded framework.


We should at the end configure Apache server to use CXF runtime, otherwhise it use by default axis2.


  • Setup the Web Service preferences


Project Creation:


Once the environement is well configured, we advance toward the creation of our project.
First let's create a Dynamic Web Project:


We want to work with Spring, so we need to add the Spring capacity and this can be done directly using the Spring IDE plugin :


To import the existing project, create a new package then import "File System"


We are using the approache  Button-Up, so we are creating the Web Service from the Java Code. To do that, we should as explained in the apache cxf tutorial begin with:

  • Create a Service Endpoint Interface SEI that describes the service we would like to expose
  • Add the required annotation to the code
  • Generate the WSDL contract for the service
  • Publish the service

Create the Service Endpoint Interface  


WebMethod, WebParam, WebResult, WebService are Jax-WS annotations available in the package javax.jwsin the J2EE Plateform. Only the WebService annotation is required, the others allows a clear generation of the WSDL. 

We don't need to use the DispatcherServlet from Spring as CXF comes with its own servlet org.apache.cxf.transport.servlet.CXFServlet

In order to configure the WebService, we need to create the web.xml and the Spring configuration file ApplicationContext.xml where we will declare our endpoint.

In the ApplicationContext file we should add some line in the bean declaration, otherwhise we will have this message " jaxws:endpoint not bound" in the Applicationcontext.xml file.


< beans xmlns="http://www.springframework.org/schema/beans"
xmlns:xsi="http://www.w3.org/2001/XMLSchema-instance"
xmlns:jaxws="http://cxf.apache.org/jaxws"
xsi:schemaLocation="http://www.springframework.org/schema/beans http://www.springframework.org/schema/beans/spring-beans.xsd
         http://cxf.apache.org/core http://cxf.apache.org/schemas/core.xsd
         http://cxf.apache.org/jaxws http://cxf.apache.org/schemas/jaxws.xsd" >


< !-- The service bean -- >
< bean id="coutVoitureServiceImpl" class="coutVoiture.CoutVoitureServiceImpl" />

< !-- Service Endpoint Defenition -- >
< jaxws:endpoint id="coutVoiture"
   implementorClass="coutVoiture.CoutVoitureServiceImpl"
   implementor="#coutVoitureServiceImpl"
   address="http://localhost:8080/coutVoiture" />


Create the Botton-Up Web Service:


You should then follow the different steps where the implementation class should be given and you can configure other generation parameters.

As We can see in the next figure, different files have been added.  The beans.xml, web.xml and the wsdl file. The Apache CXF library was also set and the Apache server was started while creating the WS.


We should then delete the beans.xml, because we have just created the ApplicationContext file. But be sure that we modify this in the web.xml. As CXF comes with its own servlet org.apache.cxf.transport.servlet.CXFServlet, we don't need to declare the DispatcherServlet of Spring. The web.xml look like that:


Once the service is publish in your Apache Server, you can see the exposed services using this URL:

  • http://localhost:8080/YourProjectName/services/  : in our case it's http://localhost:8080/G-Project/services/
  • http://localhost:8080/G-Project/services/sYourServiceName?wsdl to access to your WSDL.
Using SoapUI software, you can create a new project by fiving this WSDL adress and test your service.

Articles les plus consultés