Wednesday, February 20, 2013

Add JPA/Hibernate to an existing eclipse Project

Add JPA/Hibernate Support:


Here we have an existing Eclipse Project, to wich we would like to add JPA/Hibernate support.

Open the project properties:


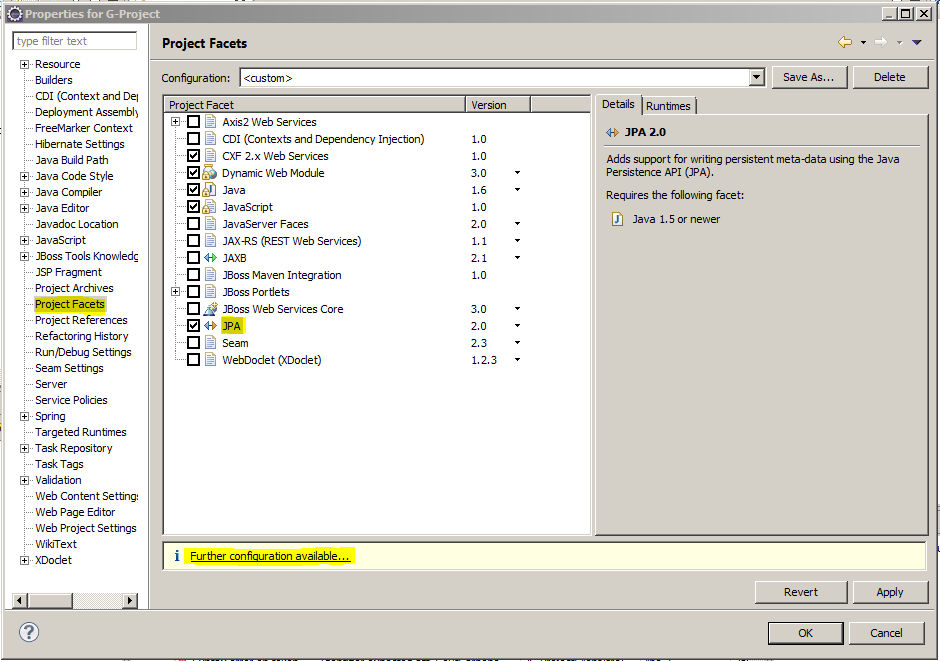
We can add more details by a simple clic on "Further configuration available. Here, we can add the connection to the database, we we have configured before ( see post Create JPA Project using JPA/Hibernate and MySQL Server  ) 


Resolve Console Configuration Error :

Here, a JPA Error appears : " Console Configuration "" does not exist. ".  In fact, a console configuration describes how the hibernate plugin should configure Hibernate and what configuration files and classpaths are needed to load the POJO's, JDBC Drivers...It is required to make use of query, reverse engineering and code generation.
To setup this Console Configuration,  we should go to the Hibernate Setting in the Project Properties.


Clic details to setup more details about the Console,


When trying to browse the persistence unit, I can't find my persistence.xml. In fact, according to Hibernate, this field is not required if my project have already /META-INF/persistence.xml in its classpath.

We can then see this configuration by opening the Hibernate Configurations View


So we can  see the different tables in the Database and even edit the created configuration.


Object-Relation Mapping- Entities Creation:

Once all is well settled, we can use the Hibernate Plugin to automatically cretae our entities. The mapping between Tables and Entities is then realized.


The entities are then created depending on tables available on our database. These entities (Java Classes, POJO) are created, they should be declared in the JPA Persistence Unit:

< class > fr.jpa.model.Vehicule </ class >

Create JPA Project using JPA/Hibernate and MySQL Server

Database Creation in MySQL Server:


We begin by downloading the MySQL installer which includes MySQL server, the JDBC and MySQL Worbench.

So let's begin by creating the database in MySQL Server:

Then we use this database in order to create our tables.  We can create for example the table Vehicule.


Creation of the Database Connection in Eclipse:

To begin, we should create the connection with MySQL Server and especially with the database that we will work on it. So let's open the JPA perspective in Eclipse in order to configure our connection.

Window -> Open Perspective -> JPA


We create then a new Database Connection.


By choosing MySql Server, we will next add the different properties about our database.


 Here we should specify the path to our Driver. It can be downloaded using MySQL Installer or directly from MySQL connector page.


After that, we should change the informations by giving the database name, the URL and User/Password proporties. We can next try the connection to be sure that all is well settled.


In the Data Source Explorer, the database connection is then added and we can consult the database and their different tables, schemes...

JPA Project Creation:


The next steps consists on creating the JPA project. To do that, we can create it directly with eclipse.


We should add the Hibernate libraries downloaded before from their repository by selecting hibernate -> Add Jars:


We specify also the Connection that we have created and we would like to work with. We can also add the MySQL driver library by checking the box for that purpose.

The JPA project looks than like that where we can see the persistence.xml configuration file in src/META-INF, hibernate libraries and MySQL connector.


To add JPA/Hibernate capabilities to an existing project, please see the post "Add JPA/Hibernate to an existing eclipse Project".

Now that we have created our JPA project, we can enhance the persistence.xml file with more properties, and manage the Object-Relational Mapping by creating the entities from the database.

Tuesday, February 12, 2013

Web Service using Apache-CXF 2.7.3 and Spring 3.2.1: Bottom-Up


In order to create a web service from an existing project, I have chosen to work with Apache CXF framework, which allows to generate buttom-up WS but also contract first WS. In my case, I have already my developed code, and should create the WS based on that code.

About Apache CXF:
  • CXF supports several standards including SOAP, the WSI Basic Profile, WSDL, WS-Addressing, WS-Policy, WS-ReliableMessaging, WS-Security, WS-SecurityPolicy, and WS-SecureConversation.
  • Apache CXF offers both contract-last (bottom-up) and Contract-first (starting with the WSDL) approaches.
  • Apache CXF implements JAX-WS and JAX-RS.

Environment installation in Eclipse:


  •  Download Apache CXF binary distribution 2.7.3 version:

Open the preferences window in eclipse, Window-> Preferences, to setup the apache server


  • Setup of Apache CXF preferences


We should give here the path to our downloaded framework.


We should at the end configure Apache server to use CXF runtime, otherwhise it use by default axis2.


  • Setup the Web Service preferences


Project Creation:


Once the environement is well configured, we advance toward the creation of our project.
First let's create a Dynamic Web Project:


We want to work with Spring, so we need to add the Spring capacity and this can be done directly using the Spring IDE plugin :


To import the existing project, create a new package then import "File System"


We are using the approache  Button-Up, so we are creating the Web Service from the Java Code. To do that, we should as explained in the apache cxf tutorial begin with:

  • Create a Service Endpoint Interface SEI that describes the service we would like to expose
  • Add the required annotation to the code
  • Generate the WSDL contract for the service
  • Publish the service

Create the Service Endpoint Interface  


WebMethod, WebParam, WebResult, WebService are Jax-WS annotations available in the package javax.jwsin the J2EE Plateform. Only the WebService annotation is required, the others allows a clear generation of the WSDL. 

We don't need to use the DispatcherServlet from Spring as CXF comes with its own servlet org.apache.cxf.transport.servlet.CXFServlet

In order to configure the WebService, we need to create the web.xml and the Spring configuration file ApplicationContext.xml where we will declare our endpoint.

In the ApplicationContext file we should add some line in the bean declaration, otherwhise we will have this message " jaxws:endpoint not bound" in the Applicationcontext.xml file.


< beans xmlns="http://www.springframework.org/schema/beans"
xmlns:xsi="http://www.w3.org/2001/XMLSchema-instance"
xmlns:jaxws="http://cxf.apache.org/jaxws"
xsi:schemaLocation="http://www.springframework.org/schema/beans http://www.springframework.org/schema/beans/spring-beans.xsd
         http://cxf.apache.org/core http://cxf.apache.org/schemas/core.xsd
         http://cxf.apache.org/jaxws http://cxf.apache.org/schemas/jaxws.xsd" >


< !-- The service bean -- >
< bean id="coutVoitureServiceImpl" class="coutVoiture.CoutVoitureServiceImpl" />

< !-- Service Endpoint Defenition -- >
< jaxws:endpoint id="coutVoiture"
   implementorClass="coutVoiture.CoutVoitureServiceImpl"
   implementor="#coutVoitureServiceImpl"
   address="http://localhost:8080/coutVoiture" />


Create the Botton-Up Web Service:


You should then follow the different steps where the implementation class should be given and you can configure other generation parameters.

As We can see in the next figure, different files have been added.  The beans.xml, web.xml and the wsdl file. The Apache CXF library was also set and the Apache server was started while creating the WS.


We should then delete the beans.xml, because we have just created the ApplicationContext file. But be sure that we modify this in the web.xml. As CXF comes with its own servlet org.apache.cxf.transport.servlet.CXFServlet, we don't need to declare the DispatcherServlet of Spring. The web.xml look like that:


Once the service is publish in your Apache Server, you can see the exposed services using this URL:

  • http://localhost:8080/YourProjectName/services/  : in our case it's http://localhost:8080/G-Project/services/
  • http://localhost:8080/G-Project/services/sYourServiceName?wsdl to access to your WSDL.
Using SoapUI software, you can create a new project by fiving this WSDL adress and test your service.

Articles les plus consultés