Friday, July 27, 2012

Let's start with Spring Framwork- Essentials, Conteneur Leger, IoC et Dependency Injection.


Some Definitions :


- The key of the Spring module are:
  • Inversion of Control
  • Aspect-Oriented Programming: AOP enables behavior tht would otherwise be scattered through different methods to be modularized in a single place (typical concerns are transaction management, logging, failer monitoring)
  • Data access abstraction: spirng encourages a consistent architectural approach to data access, and provides a unique an powerful abstraction to implement it.
  • JDBC simplification
  • Transaction Management: spring provides a transaction abstraction that can sit over "global" transactions (managed by an application server) or "local" transactions using the JDBC, Hibernate...
  • MVC web framework
- Spring addresses each layer :
  • Presentation layer with the Spring MVC framework which is similar to struts
  • Logic layer by using a lighweight IoC container and supporting the AOP (crosscutting aspects such as security, log,...)
  • Persistence layer supporting different ORM.
- When you create a bean definition what you are actually creating is a recipe for creating actual instances of the class defined by the bean definition.
- the scopes supported by spring are :
  •  singleton, prototype
  • request, session and global session : valid in the context of a web-aware Srping ApplicationContext
- The scope of the Spring singleton described as per container and per bean. This means that if you define one bean for a particular class in a single spring container, then the spring container will create one and only one instance of the class defined by this bean definition.
-The prototype scope results in the creation of a new bean instance every time a request for that specific bean is made. You should use the prototype scope for all beans that are stateful, while the singleton scope should be used for stateless beans. The container instantiates, configures, decorates and otherwise assemble a protorype object, hands it to the client and then has no further knowledge of that prototype instance. It is the responsibility of the client code to clean up prototype scoped objects and release any expensive resources that the prototype bean are holding onto.

- The BeanFactory is the actual container which instantiates, configures, and manages a number of beans.
- ApplicationContexts are a subclass of BeanFactory

ClassPathXmlApplicationContext appContext = new ClassPathXmlApplicationContext(
        new String[] {"applicationContext.xml", "applicationContext-part2.xml"});
// of course, an ApplicationContext is just a BeanFactory
BeanFactory factory = (BeanFactory) appContext;
 
- BeanFactory is lightweight, but if you're going to be using Spring "for real", you may as well go with the ApplicationContext
- The ApplicationContext builds on top of the BeanFactory (it's a subclass) and adds other functionality such as easier integration with Springs AOP features, message resource handling (for use in internationalization), event propagation, declarative mechanisms to create the ApplicationContext and optional parent contexts, and Application-layer specific contexts such as the WebApplicationContext, among other enhancements.


Inverion of Control:

-Inversion of Control has already been referred to as Dependency Injection. The basic principle is that beans define their dependencies only through constructor arguments, arguments to a factory method, or properties which are set on the object instance after it has been constructed or returned from a factory method. Then, it is the job of the container to actually inject those dependencies when it creates the bean.

- With IoC, framework code invokes application code, coordinating overall workflaw, rather than application code invoking framework code. It follows the Hollywood Principle where the framework code invokes application code, coordinating overall workflow, rather than application code invoking framework code.
- Dependency Injection is a form of push configuration; the container pushes dependencies into application objects at runtime. this is the opposite of traditional pull configuration, in which the application object pull dependencies from the environment.
- The basic IoC container in Spring is called bean factory
- Spring supports a somewhat more advenced bean factory, called the application context
- An application context is a bean factory with the org.springframework.context.Application context interface being a subclass of BeanFactory.
- In Spring, the controller (DispatcherServlet) controls the view and model by facilitating data exchange between them. No one of the two components is aware of the other component. So the model worry only about the data but not the view.


Ref:

http://www.springsource.org/
Professional Java Development with the Spring Framework, by Rod Johnson et al.

Friday, June 1, 2012

Converting from Hibernate hbm.xml to annotations (JPA)

I am trying to migrate my Hibernate project from mapping using the hbm.xml to the annotations using the Java Persistence API JPA.

During the generation of the mapping files, I have the hbm.xml but also the annotated POJO. Accoding to Hibernate, once we have the *.hbm.xml files and the annotations, the hbm will have the priority and will be then used by default.  In order to change this priority, we can modify the proriety hibernate.mapping.precedence from the default value hbm, class to the new value class, hbm.
So I have done this change in my src/hibernate.cfg.xml file to test it before using the persistence.xml file.

< property name="hibernate.mapping.precedence" > class < / property >

So my persistence.xml file looks like that:

< persistence version="1.0" xmlns="http://java.sun.com/xml/ns/persistence" >
< !-- Transaction type is jta by default for the JEE environment -- >
    < persistence-unit name="myHibernateSession" transaction-type="JTA" >
      
        < jta-data-source > java:/jdbc/myDatasource < / jta-data-source >  
              
        < properties >
            < property name="hibernate.mapping.precedence" value="class, hbm" / >
            < property name="hibernate.connection.url" value="jdbc:mysql://localhost:3306/myDB " / >
            < property name="hibernate.connection.username" value="admin" / >
            < property name="hibernate.connection.password" value="admin" / >
            < property name="hibernate.dialect" value="org.hibernate.dialect.MySQL5Dialect" / >
            < property name="hibernate.connection.driver_class" value="org.gjt.mm.mysql.Driver" / >
        < / properties >

    < / persistence-unit >
< / persistence >

While checking in the JBoss server log, I have noticed that Hibernate uses all the time the org.hibernate.cfg.HbmBinder which "Walks an XML mapping document and produces the Hibernate configuration-time metamodel".

Or when using the annotation, the binder should be the org.hibernate.cfg.AnnotationBinder. So I have
removed all my *.hbm.xml files.


When I have tested my solution, I have error telling me that "myHibernateSession not bound" so my hibernate sessionFactory is not bound and thus not working and the access to my data is impossible.
Log :
 get hibernate session
 get hibernate session factory
 myHibernateSession not bound

To initialise the context, we should change the code to  retreive the hibernate sessionfactory  from the entity manager.

EntityManagerFactory emf = Persistence.createEntityManagerFactory("myHibernateSession");
EntityManager em = emf.createEntityManager();    
Session sessionFactory = (Session)em.getDelegate();

All seems to be good now, I test my application and now its works and my session is opened except that I have this error :O
Log:
javax.persistence.PersistenceException: org.hibernate.HibernateException: The chosen transaction strategy requires access to the JTA TransactionManager

When specifying the parameter  transaction-type="RESOURCE_LOCAL", I have read that
"In a Java EE environment, if this element is not specified, the default is JTA. In a Java SE environment, if this element is not specified, the default is RESOURCE_LOCAL."

So I have set the transaction type to JTA, and the error was :

javax.persistence.PersistenceException: org.hibernate.HibernateException: The chosen transaction strategy requires access to the JTA TransactionManager

The solution was to add this property to my persistence.xml file

< property name="hibernate.transaction.manager_lookup_class"
value="org.hibernate.transaction.JBossTransactionManagerLookup" / >
 
or this one if your are not using JBOSS
< property name="hibernate.transaction.manager_lookup_class" 
 value="com.atomikos.icatch.jta.hibernate3.TransactionManagerLookup" / >
 
Yopiii, Now all is well working. 
 

Friday, May 25, 2012

Resolved : JBOSS Installation on Eclipse

Installation de JBoss Tools:


Aujourd'hui j'installe JBOSS Tools sous eclipse.  Au cours de cette installation, j'ai commencé par installer eclipse, svn pour la récupération des codes source puis JBOSS Tools 3.3. Par la suite j'ai procédé à la récupération des codes et la, une erreur :

An internal error occurred during: "Initializing Java Tooling".
java.lang.NullPointerException


La deuxième tentation, j'ai installé Eclipse et svn, puis j'ai récupéré le code souce. Tout s'est bien passé. J'ai donc installé Jboss Tools et la, une erreur s'est encore produite et je n'arrive plus à accéder à mon code source
!ENTRY org.eclipse.jface 2 0 2012-05-25 08:48:55.364
!MESSAGE Keybinding conflicts occurred.  They may interfere with normal accelerator operation.
!SUBENTRY 1 org.eclipse.jface 2 0 2012-05-25 08:48:55.365
!MESSAGE A conflict occurred for ALT+CTRL+P:
Binding(ALT+CTRL+P,
 ParameterizedCommand(Command(org.eclipse.team.svn.ui.command.CreatePatchCommand,Create Patch...,
  ,
  Category(org.eclipse.team.svn.ui.command.category,SVN,null,true),
  org.eclipse.team.svn.ui.action.local.CreatePatchAction,
  ,,true),null),
 org.eclipse.ui.defaultAcceleratorConfiguration,
 org.eclipse.ui.contexts.window,,,system)
Binding(ALT+CTRL+P,
 ParameterizedCommand(Command(org.jboss.tools.maven.ui.commands.selectMavenProfileCommand,Select Maven Profiles,
  ,
  Category(org.eclipse.ui.category.window,Window,null,true),
  org.jboss.tools.maven.profiles.ui.internal.ProfileSelectionHandler,
  ,,true),null),
 org.eclipse.ui.defaultAcceleratorConfiguration,
 org.eclipse.ui.contexts.window,,,system)

!ENTRY org.eclipse.core.resources 4 2 2012-05-25 08:48:59.720
!MESSAGE Problems occurred when invoking code from plug-in: "org.eclipse.core.resources".
!STACK 0
java.lang.NullPointerException
 at org.jboss.ide.eclipse.as.classpath.core.ejb3.EJB3ClasspathContainer.getClasspathEntries(EJB3ClasspathContainer.java:116)


Afin de récupérer le stacktrace d'eclipse, rendez vous dans le dossier Workspace -> .metadata et la vous trouverez le fichier .log.

J'ai par la suite j'ai suivi les conseil d'un ami ( Kevin ) et ce tutorial proposé par Objis.


La Solution - Intégration du serveur JBoss  First :


Une fois Eclipse et SVN sont bien installés, je commence l'installation du plugin JBoss Tools.
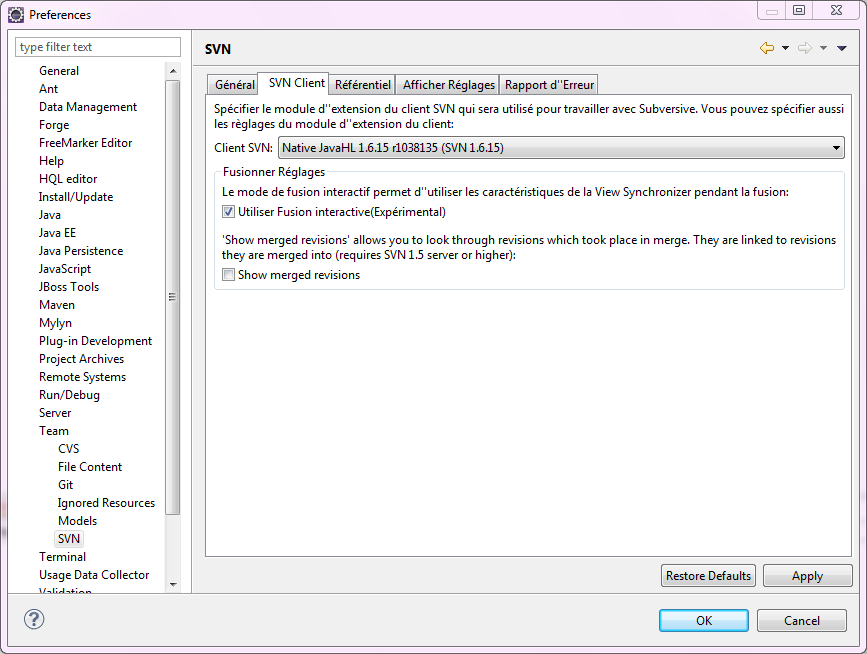
Pour bien utilisé SVN, il faut s'assurer d'avoir télécharger le connector qui va bien avec le système. Les connecteurs sont proposés automatiquement par eclipse une fois svn est installé et qu'Eclipse est redémarré. Afin de voir les connecteurs, il suffit d'aller à Windows -> Preferences -> Team -> SVN et Visiter l'onglet SVN Client. Mon connector est Native Java HL 1.6.15:


J'accède alors à l'outil d'installation de nouveau software d'eclipse  (Help -> Install New Software) tout en spécifiant le site d'installation de JBoss Tools.


Une suite c'est fait, je passe à la configuration de mon serveur JBoss:


 Je spécifie par la suite la localisation de mon serveur JBoss (Que j'ai téléchargé et dézippé dans la racine D:\). J'ai notamment choisit la bonne version de mon Java Runtime Environment.


 Voila, dans cette fenetre je coche la case Server is externally manager.


Et le serveur est la dans la View Server:


Après toute cette manipulation, j'ai redémarrer Eclipse et par la suite j'ai importé mon code source avce SVN et la.... Ca maaaaaaaaaaaaaaaaarche, I am Happy :-). 

Wednesday, May 23, 2012

Installation de Java avec Erreur : Error occurred during initialization of VM

Dernierement j'ai essayé d'installer Java 1.6 et Eclipse.

Suite au téléchargement d'eclipse et en essayant de le lancer un message d'erreur est apparu:

the eclipse executable launcher was unable to locate its companion shared library

Au départ j'ai cru que c'est un probleme d'eclipse mais apres pas mal de tentations il s'est avéré que c'est le probleme de Java. En effet, en essayant la commande Java -version ou Java sur la ligne de commande, un message d'erreur s'affiche:

Error occurred during initialization of VM
java/lang/NoClassDefFoundError: java/lang/Object windows

J'ai essayé donc de modifier la valeur d'environnement (clic droite sur le poste de travail-> Propriete->Parametre Systeme Avancee -> Variables environnement)
La dans les variables système, il faut faire des modification au niveau du path, en rajoutant le chemin de dossier Java et plus précisément le JDK, mais ATTENTION, ce chemin doit être remseigné en debut et non pas à la fin:


Path= C:\Program Files\Java\jdk1.6.0_32\bin\;%SystemRoot%\system32;%SystemRoot%;%SystemRoot%\System32\Wbem;%SYSTEMROOT%\System32\WindowsPowerShell\v1.0\

Voila, suite à ses modifications, eclipse s'est à la fin lancé et tou fonctionne super bien ;-)

Saturday, February 25, 2012

Maven 3 Installation

C'est quoi Maven:

Maven est un  logiciel permettant la gestion des projets. Il est basé sur le concept du Projet Object Model (POM) et permet l'automatisation des tâches récurrentes, la gestion des dépendances et la génération de rapport permettant un meilleur pilotage de projet.

Installation de Maven 3 sous ubuntu:

J'ai essayé d'installer Maven2 avec la commande :
sudo apt-get  install maven2
L'installation est terminée avec succès mais lors de lancement des commandes maven, j'ai eu des soucies avec Java. Donc j'ai décider d'installer la dernière version de Maven d'une facon manuelle.

Après récupération du packet Maven3 du site de Apache, on peut utiliser le terminal pour décompresser le dossier.
$ tar -xzvf apache-maven-3.0.4-bin.tar.gz


J'ai crée ensuite un dossier apache-maven dans usr/local/ et on copie le contenu du dossier télécharger dans cet emplacement :
$ sudo mkdir /usr/local/apache-maven
$ sudo cp -R apache-maven-3.0.4 /usr/local/apache-maven/ 

J'enchaine maintenant avec la modification des variables d'environnement en utilisant cette commande dans le terminal :
sudo gedit .bashrc

.bashrc est un fichier caché dans /home/myUser et on peut le voir dans ce dossier en utilisant Ctrl h.

Donc il faut modifier la variable PATH et rajouter les variables JAVA_HOME, M3_HOME, MAVEN_HOME et M3. Il faut vérifier que le JDK de Java est bien installé.

PATH=$PATH:/usr/local/apache-maven/apache-maven-3.0.4/bin"
JAVA_HOME="/usr/lib/jvm/java-6-sun"
M3_HOME="/usr/local/apache-maven/apache-maven-3.0.4"
MAVEN_HOME="/usr/local/apache-maven/apache-maven-3.0.4"
M3="/usr/local/apache-maven/apache-maven-3.0.4/bin"

Voila, tout est normalement bien installé. Il suffit de quitter le terminal et de le re-ouvrir. Après on peut vérifier notre installation en tapant la commande
mvn - version

Sunday, February 12, 2012

Méthode Agile

Voila, lors d'une présentation d'un ami, je viens de découvrire les méthodes Agiles. J'ai essayé donc de voir de plus près ces méthodes qui ont pris pas mal de succès ces dernier temps dans le monde des entreprise.
Ces méthodes reposent essentiellement sur le respect de 5 principent qui sont :
  • Adoption d'un cycle itératif et incrémental
  • Implication du client dans la réalisation du produit
  • Le travail collaboratif et la mise en avant de l'effort de l'équipe
  • Précision des objectifs à court termes
  • La livraison d'un produit fonctionnel et qui obeit aux attentes du client.
Afin de comprendre les méthodes Agiles, il faut bien comprendre quelques termes comme :
  • Product Owner qui n'est autre que le client
  • Scrum Meeting qui est une courte réunion quotidienne d'environ 15 minutes, permettant à l'équipe de discuter sur ce qui a été fait, les difficultés rencontrées et les objectifs du jour
  • Product Backlog afin de gérer dynamiquement les fonctions du produit à réaliser ainsi que leurs priorités
  • L'integration continue du produit englobant la compilation, le testing...
Scrum est une méthde Agile permettant de gérer les projet.  L'idée de base est l'utilisation d'une spécification incrémentale. Au début du projet, le Product Owner (client) liste des scénarios d'utilisation (Product Backlog) en attribuant pour chaque scénario une valeur métier donnant une idée sur son importance dans le projet.

A suivre ...

Articles les plus consultés